Keeping Shrimp
Interested in keeping shrimp of your own?
Shrimp are a wonderful way to get into aquariums, but it’s important to keep the right kind of shrimp in the right environment and set it up properly to keep them alive and thriving.
There are many different kinds of shrimp and many of them have different requirements for their environment and care. The specifics mentioned here are suggestions for the parameters that I use with my neocaridina and bamboo shrimp. Please do your research and make sure that you are setting up a proper environment for the shrimp you choose!
Pre-Setup Steps
First, you need to decide what kind of shrimp you want to keep. If you are new to the hobby, I recommend neocaridina shrimp as they are fairly easy to find and great for beginners. The parameters and advice I give in this guide are specific to neocaridina so if you choose any other type of shrimp to keep, make sure you verify the specifics for that type of shrimp.
Find an aquarium that will fit your space. The great thing about neos is that you can have a lot shrimp even in a small tank. Their impact on the water quality and waste produced is so low that they have very little bioload. Even a small 5 gallon tank can hold a lot of neos.
Substrate (the material on the bottom of your tank) can take a lot of forms. Here are some of the common options:
Aquarium gravel: this is the common gravel that people use in all kinds of aquariums. If you plan to keep live plants in the aquarium you may want to add a layer of fertilizing substrate under your gravel to provide nutrients for the plants.
Decorative sand: this is a popular choice for people who keep neocaridina shrimp. Some keepers love the look of black sand against the bright colors like yellow, orange, and red.
Clay-based substrates: these are great if you plan to keep a good amount of plants in your aquarium. They store and release nutrients for the plants to keep the plants healthy.
Lava rock: this can be used and may provide a lot of surface area for helpful bacteria to grow. It can also be used underneath other forms of substrate to help build up the base or create unique aquascape features. Just make sure you grind down any sharp edges before you add this type of rock.
For neocaridina shrimp, any of these substrates would work. Make sure you plan out your tank and use the type of substrate that gives you the look you want and provides for any plants that you plan to keep in the tank.
The type of filter you use will depend on multiple factors including the size of your tank. I do not cover saltwater filters or setups in this guide.
There are multiple types of filters, but for most smaller freshwater tanks, you can use something simple like a sponge filter or HOB (hang on back) filter. These two types of filters fall into the mechanical filters category.
Sponge filter: this type of filter is a basic filter that uses a sponge and air pump to filter the water. As the air bubbles rise, water is pulled into the filter trapping larger particles in the sponge. It also provides a space for beneficial bacteria to grow (more details in the ammonia cycle section).
HOB filter: this is the filter many people are used to seeing hanging off of the back of the tank. They pull water in and filter it through some type of material before the water is pushed back into the tank. These filters can provide mechanical and chemical filtration with some even providing space for biological filtration. These are probably the most common sort of filter for a freshwater shrimp tank. One note with these is to add a sponge or some kind of mesh that will keep your shrimp from getting sucked into the filter.
Canister filters: these are typically used with larger aquariums and include an external canister that pushes water through filter media for thorough filtration.
Undergravel filters: these are not as popular as they once were, but pull water through the gravel substrate to create a biological filter. These filters can be problematic with plants and are difficult to get to if you have any issues. I do not recommend them for shrimp tanks.
Light is important for your aquarium. First, you want to be able to see your shrimp. Having the right light helps you ensure that you can enjoy your colorful shrimp. Probably the most popular choice for lights today are LED. They provide a great amount of light without heating the water and last for a long time. They also use a relatively small amount of energy.
It is important to have a light cycle that includes both day and night times for the tank. The shrimp you keep will be used to a cycle that likely includes around 12 hours of light and 12 hours of darkness (give or take). Use a timer to make the cycle easy to manage.
What about at night?
For my tank, I have a dim blue light ("moonlight") that I keep on for a couple of hours towards the end of my light cycle. This allows for a darker period for my shrimp (and fish), but still allows me to see them for a while at night. It is not recommended to keep even blue light on all night because it can cause an algae bloom and disrupt the resting cycles of your shrimp and/or fish.
This is one of the most fun parts of setting up your aquarium. Some prefer a more natural feel with plants, wood, and rock. Others love random or themed decorations. It's your aquarium so make it your own.
Some tips to remember here:
- Do not use plastic plants. These can leak chemicals into the water that can harm your shrimp.
- Be aware of the type of wood and rocks that you're using. For beginners it is best to use wood that has been treated for aquariums. Be careful of the type of wood you use because it can release chemicals into the water. Cholla wood is a popluar choice for shrimp.
Shrimp love plants. If you can keep live plants in your tank it will help you maintain a stable environment, places for the shrimp to hide, and a source of food for the shrimp. Popular plant sources for shrimp are:
- java moss
- anubias nana
- water wisteria
- Amazon frogbit
- java fern
There are many more so do some research into what will work in your tank and fits your desired look.
Not all plants are created equal. Pay attention to how much light they need and if they need additional care like added carbon dioxide. For beginners, the easier plants like java moss are a great addition to the aquarium.
If you need to use fertilizer, make sure it is shrimp safe as I have seen some shrimp keepers report that some fertilizers caused massive deaths in their tanks. Just be careful and do your research.
I cannot stress this enough...you will absolutely need a water testing kit. This is not the test strips that you dip into the water.
The most accurate way to test water is with a digital checker like the Hanna Checkers. These are very expensive, but if you have an issue like color blindness, they are a great option.
The most common way to properly test the water is with a test kit that uses a chemical reagent like API's Freshwater Master Test Kit to check each of the parameters. The Master Test Kit will give you what you need to check pH, Ammonia, Nitrite, and Nitrate.
I also recommend getting additional tests for GH (general hardness) and KH (carbonate hardness). These are important measures for shrimp and good to track.
Some experienced keepers will also recommend a TDS (total dissolved solids) meter. This can be helpful as well, but I do not use this as much as my parameters generally stay fairly steady.
Whichever route you go...make sure you get your testing supplies before you add any live animals to your tank. You will want to be able to keep track of the water quality.
Now that you have what you need to set up your tank, you're ready for water.
There are multiple sources of water. Some people have success just using their tap water. Others use reverse osmosis (RO) water. This water has been filtered to remove most of the biological and chemical substances in the water. You can often purchase RO water from aquarium and pet stores, but I do not recommend the pre-bottled water that is sold on the shelf as it can get very expensive with little to no added value. Check with your local pet or fish store to see if they offer RO water. You can also purchase an RO filter for your home.
Regardless of what water you choose to use, the first thing you want to do is test the water before you put it in the aquarium. You need to know what the parameters of the water are before it mixes with your aquarium water. In my area, we have extremely hard water that has a very high pH. If I were to use my tap water, my pH and GH would be way too high. I have two local stores that sell RO water. One of them has a pH of around 7.5 with a GH and KH of 8 which is pretty high for RO water. I have to be careful using this water so I don't drive my KH too high.
When you find the right water (or combination as you can use both RO and tap to get the right parameters), you're ready to fill your tank.
Cycling Your Tank

Failing to properly cycle your tank is one of the most common mistakes a beginner can make. So what does this mean?
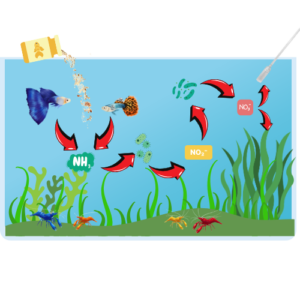
Cycling refers to the nitrogen cycle in the tank. Here's how that looks:
- Live animals and excess food produce waste in the tank that decays and creates ammonia.
- Nitrifying bacteria consume the ammonia and produce nitrite.
- Another strain of bacteria consume the nitrite and produce nitrate.
- Nitrates are absorbed by live plants and used and/or removed from the tank during water changes.
Until you properly cycle your tank, you do not have a community of bacteria built up to properly handle the ammonia in your tank. This can cause ammonia spikes which are lethal to shrimp and fish.
There are multiple ways to start a cycle. You can purchase substrate that has live bacteria in it to help jumpstart the cycle. You can even use filter media from someone's existing tank to help as well.
But to start from scratch you will want to kickstart the cycle. I recommend adding some Seachem Stability to the tank. Just follow the dosing instructions for setting up a new tank.
To get the cycle started, you will need to have a source of ammonia since you don't have fish or shrimp in the tank yet (hopefully - there is a fish-in cycle method, but I'm not getting in to that). You can add pure ammonia directly, but be careful because too much can stall your cycle. You are shooting for about 5 parts per million (ppm). One of the best ways is to add fish food to the tank and allow it to decompose. Test the water and try to keep the ammonia around 3-5 ppm.
Continue to check your water and add more fish food if your ammonia levels begin to drop keeping it around that 3-5 ppm level.
As the bacteria begin to establish in the tank, you will see the ammonia levels drop and the nitrite levels spike. You don't want the ammonia to drop to zero yet because a lack of ammonia will cause the cycle to stall at this point.
Eventually you will see the nitrite levels fall and nitrate levels begin to rise. When you see your ammonia and nitrite levels falling to zero quickly and your nitrate levels growing your tank is cycled.
This will likely take at least 4-8 weeks. Don't rush and let the cycle build up properly to ensure that you are putting your shrimp in a healthy environment.
Now that you have a cycled tank, you are just about ready for your shrimp.
You want to make sure that your parameters are set for the shrimp first.
You will likely need to do a water change to make sure that your water is ready since you have been building up nitrates in your cycle. You generally only want to change around 10-20% of your water if possible at any time. You want your nitrates to be under 50 ppm in a planted tank. Remember that your plants use nitrates so you're not looking for 0 ppm if you have live plants. I keep my planted tank around 10-20 ppm and do a small water change around 30-40 ppm. If you have a heavily planted tank, you may not have to do frequent water changes.
Before you put your shrimp in, you want to check your parameters. The parameters below are general ranges for neocaridina shrimp. If you are getting other types, make sure you research the right ranges for them as well.
- pH: 6.5 - 8
- Ammonia: 0 ppm
- Nitrite: 0 ppm
- Nitrate: <50 ppm
- GH: 4 - 14 dGH
- KH: 3 - 8 dKH
Some recommendations are to have a 2:1 ratio of GH to KH meaning if your GH is 10 dGH you should have 5 dKH.
With those parameters right, you also want to consider temperature. Ideal temperature is around 65 - 85 degrees F (18 - 29 C). At higher temperatures the shrimp will grow faster, but it can also lower their life span a bit. If you don't have tropical fish in your tank you may want to keep your tank around 70 degrees as a good target. Depending on your area, you may need to get a small tank heater during cold months.
The key to happy neos is stability. Try not to have large swings in your parameters. They are a pretty hardy shrimp that can live in a wide range of conditions, but large fluctuations can be lethal.
Stocking Your Tank
Now you're finally ready for shrimp!
Decide if you want to have a skittles tank with multiple different colors or stick to a single color. I love having skittles tanks, but eventually the offspring will trend toward the "wild" coloration instead of the bright colors.
Before you put them in your tank, you want to prepare them. You will do this with drip acclimation.
As I mentioned in the previous step, large swings in parameters can kill your shrimp. To avoid this, you want to slowly add tank water to the container with your shrimp. First, test the water that the shrimp came with from the supplier. How long this takes depends on how different that water is from your parameters.
I put my new shrimp with their existing water into a container and set a container of tank water to slowly drip (about 1 drip per second) into the container. I've had shrimp who only took an hour or two and shrimp that took 12 hours to drip acclimate and reach similar parameters. Be patient and let them get used to the changes.
You can get drip acclimation kits online if you don't want to make your own. Another method is to add small amounts of tank water to the shrimp container every 5-10 minutes over a period of time if you can't drip acclimate. The smaller amounts keep you from shocking them too much at once.
Once your parameters are matched (or very close), you are ready to add your new shrimp to the tank.
WAIT! Don't just dump them in your tank.
You always want to be careful when you add new shrimp (or fish) to your tank. The water from the supplier can have hitchhikers or parasites that could harm your tank.
Use a net to move your shrimp from their acclimation container to their new home. Once they are all moved, you can discard the water that held the shrimp. (Make sure you double check to look for any stragglers or even shrimp babies that may have shown up in transit).
With your shrimp in their new home and you monitoring the water parameters, you now need to feed them and enjoy.
A planted tank may produce a good amount of biofilm that they will eat so you don't have to feed too much. There are a lot of differing opinions about feeding. One thing that is common is that a variety of food is good. I use two kinds of shrimp food, algae wafers, and even frozen baby brine shrimp on a rotation and feed them every 2-3 days. I also supplement with the occasional organic spinach, cucumber, or zucchini. They enjoy these, but make sure you look up how to prep them before you feed these to your shrimp.
There are a lot of situations and caveats to keeping shrimp. We all lose shrimp at some point so don't get too discouraged. You will get the hang of it and it is a hobby that is definitely work it!
Important Note: This guide is meant to give you some best practices if you would like to get into this hobby. Note that this is not intended to be a comprehensive guide to caring for your shrimp and I am not a marine biologist. This information is provided solely based on my experience and research and is intended for educational purposes only. Keeping live animals is a hobby that can be very rewarding and frustrating. Even experienced shrimp keepers sometimes lose their shrimp. Use of the information on this page is done at your own risk.
